chocolate spoons recipe for 2 people, along with some approximate nutritional information:
Chocolate Spoons for Two
Ingredients:
– 100 grams of high-quality chocolate (dark, milk, or white)
– 2 plastic or wooden disposable spoons
– Toppings (optional): 2 teaspoons crushed nuts, sprinkles, crushed candy canes, etc.
Nutritional Information (Approximate, per serving):
– Calories: 150 kcal
– Total Fat: 9g
– Saturated Fat: 5g
– Cholesterol: 0mg
– Sodium: 0mg
– Total Carbohydrates: 16g
– Dietary Fiber: 2g
– Sugars: 12g
– Protein: 2g
Instructions:
1. Prepare the Spoons:
– Clean and dry two spoons. If using wooden disposable spoons, ensure they are food-safe.
2. Melt the Chocolate:
– – Chop the chocolate into small, consistent pieces to ensure uniform melting.
– Heat the chocolate either using a double boiler or in the microwave. Heat in 20-30 second intervals, stirring between each until fully melted. Avoid overheating.
3. Coat the Spoons:
– Hold each spoon by the handle and dip the bowl into the melted chocolate, fully coating it.
-Let any extra chocolate drip off and return to the bowl.
4. Decorate (Optional):
– Sprinkle toppings (e.g., crushed nuts, sprinkles) over the wet chocolate.
5. Set on Parchment Paper:
– Place the coated spoons on a parchment paper-lined tray, ensuring they don’t touch.
6. Let it Set:
– Allow the chocolate to set at room temperature or expedite the process by placing the tray in the refrigerator. It may take one to two hours.
7. Serve:
– Once the chocolate hardens, the spoons are ready to use. Enjoy them with hot drinks like coffee or hot chocolate.
8. Optional Drizzle (Optional)
– Melt a small amount of contrasting chocolate and drizzle it over the hardened spoons for added decoration.
Please note that the nutritional information is approximate and can vary based on the specific type and brand of chocolate used. Adjustments may be needed based on your specific dietary requirements or preferences.
How do you use a chocolate spoon?
Chocolate spoons are a versatile and delightful addition to various hot beverages. Whether you’re stirring them into your coffee, hot chocolate, espresso, or warm milk, these chocolate spoons transform ordinary drinks into flavorful experiences. For coffee lovers, they instantly turn a regular cup into a delicious mocha, infusing it with rich chocolate goodness. Similarly, when added to ready-made hot cocoa, these spoons enhance the flavor, providing an extra layer of indulgence.
Beyond beverages, chocolate spoons offer a sweet touch to desserts, making them a versatile treat. Plus, the joy of savoring the chocolate directly from the spoon to your mouth is a simple pleasure.
The versatility of chocolate spoons extends to various occasions. They’re a hit at birthday parties, bringing a touch of sweetness to the celebration. As creative wedding gifts, chocolate spoons add a personalized and indulgent touch. Additionally, they make for a fantastic DIY craft, perfect for kids to create together, combining fun and deliciousness in one delightful activity. Whether you’re looking to elevate your hot drinks, enhance desserts, or create memorable gifts, chocolate spoons are a go-to treat for various occasions.
What kind of spoons do you use?
You can use plastic spoons or wooden disposable spoons for making chocolate spoons. These types of spoons are commonly chosen for their convenience and disposability, making them suitable for crafting and serving chocolate treats.
How do I melt chocolate?
1. Double Boiler Method:
– Create a double boiler by placing a heat-safe bowl over simmering water.
– Add chocolate, stirring until melted.
– Effective but can be messy and use multiple dishes.
2. Microwave Method:
– Microwave chocolate in short 15-30 second intervals, stirring often.
– Quick but requires attention and may take time.
3. Crockpot Method (Personal Favorite):
– Add a small amount of water to a crockpot and set it on high.
– Place glass tumblers or mason jars with chocolate in the water.
– Chocolate melts evenly, and gently, and stays warm.
– Ideal for melting different chocolate types simultaneously.
The crockpot method is especially favored for its convenience in melting multiple types of chocolate simultaneously and keeping them warm throughout the process.
How To Make Chocolate Dipped Spoons
How to Make Chocolate Dipped Spoons:
- Prepare the Spoons:
– Clean and dry the spoons, ensuring they are ready for dipping.
- Melt the Chocolate:
– Choose your preferred melting method: double boiler, microwave, or crockpot.
- Dip or Fill the Spoons:
– Option 1 (Traditional): Dip each spoon into the melted chocolate, but be mindful of spillage.
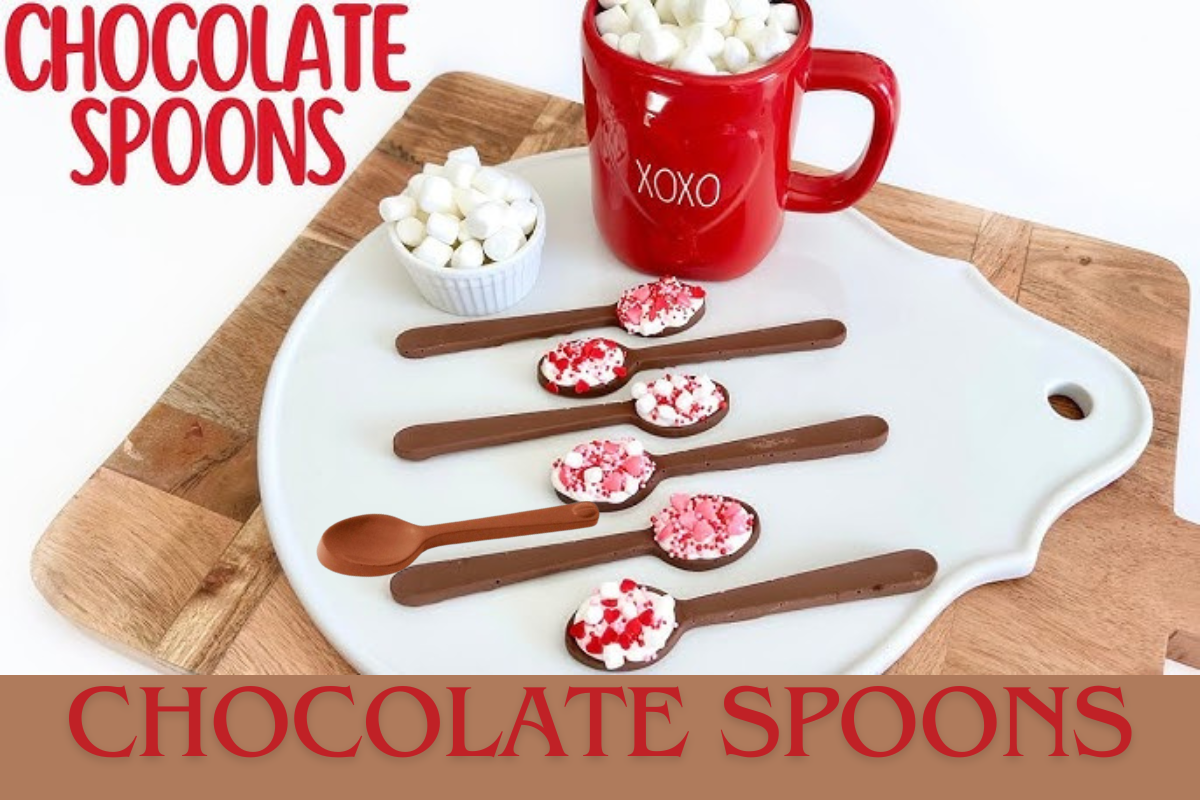
– Option 2 (Preferred): Place spoons on a parchment paper-lined sheet, level them by resting handles on the sheet edge. Pour or pipe melted chocolate directly into the wells using another spoon or a plastic/piping bag.
- Add Toppings:
– While the chocolate is still wet, fill the wells to the top and add your desired toppings.
- Let Them Set:
– Allow the chocolate-dipped spoons to harden at room temperature or expedite the process by placing them in the refrigerator.
- Avoid Fast Cooling:
– Prefer letting them harden at room temperature to prevent rapid cooling, which could cause the cocoa butter to separate and give a slightly ashy appearance.
Your chocolate-dipped spoons are now ready to enhance your hot beverages or make charming gifts. This method ensures a neater appearance and even filling of the spoon wells
How do I wrap these spoons?
Wrapping chocolate-dipped spoons can add a delightful touch, especially if you’re planning to give them as gifts or include them in party favors. Here’s a simple guide on how to wrap chocolate-dipped spoons:
Materials Needed:
Cellophane or Plastic Wrap:
Use transparent cellophane or plastic wrap to showcase the chocolate spoons.
Ribbon or Twine:
Choose a decorative ribbon or twine to tie around the wrapped spoons.
Gift Tags (Optional):
If you’re giving the chocolate-dipped spoons as gifts, consider attaching a small gift tag with a personalized message.
Tips:
- Consider using colored cellophane or coordinating ribbon to match the theme or occasion.
- Personalize the gift tags with the recipient’s name or a special message.
- If you’re making a larger quantity, you can bundle several spoons together before wrapping for a charming set.
This wrapping method adds a touch of elegance to your chocolate-dipped spoons, making them not only delicious but visually appealing for gifting or serving at events
How long do they last?
The shelf life of chocolate-dipped spoons depends on several factors, including the type of chocolate used, storage conditions, and the presence of any perishable ingredients. Here are some general guidelines:
1. Type of Chocolate:
– Dark chocolate tends to have a longer shelf life compared to milk or white chocolate due to its lower milk content. Dark chocolate can last several weeks to a few months.
2. Storage Conditions:
– Store chocolate-dipped spoons in a cool, dry place away from direct sunlight and heat. Excessive heat can cause the chocolate to melt, affecting its texture and appearance.
3. Perishable Ingredients:
– If your chocolate-dipped spoons include perishable ingredients like fresh cream or fruits, they have a shorter shelf life and should be stored in the refrigerator. Consume them within a week or as recommended for the specific perishable ingredient.
4. Packaging:
– Properly wrapped and sealed chocolate-dipped spoons are less prone to absorbing odors or moisture, which can affect their quality. The wrapping helps preserve their freshness.
5. Cocoa Butter Separation (Blooming):
– Over time, chocolate may experience a phenomenon called blooming, where cocoa butter rises to the surface, creating a whitish appearance. While this doesn’t necessarily affect the taste, it may impact the aesthetic appeal.
In summary, if stored properly, chocolate-dipped spoons can last for several weeks to a few months. However, for the best quality and taste, it’s advisable to consume them within the first few weeks. Always check for any signs of spoilage, such as off odors or changes in appearance, before consuming.
Variations for chocolate spoons
-
Hot Chocolate Spoons:
- Enhance the flavor of ready-made hot chocolate.
- Serve with various types, like peppermint or those adorned with tiny marshmallows.
-
Peppermint Spoons:
- Ideal for peppermint cocoa lovers.
- Use crushed candy canes or Andes Mints for a unique twist.
- Consider using peppermint candy cane spoons.
-
Peppermint Sticks:
- An alternative to chocolate spoons.
- Dip tall peppermint sticks in chocolate for a delicious hot cocoa experience.
- Add sprinkles for extra sweetness.
These variations add a festive and flavorful touch to the traditional chocolate spoon concept
Read More about : How to make toasted white chocolate mocha Step by Step Guide